A comprehensive dive into WebRTC for client-server web games
15 Mar 2017Multiplayer games are fun. For what they lack in single player immersion, online games compensate with uniquely rewarding experiences in questing with friends, meeting strangers online, and clashing head to head against competent peers. One needs to look no further than the giants of League of Legends, Hearthstone, and Overwatch to realize the mass demand for multiplayer games.1 While these franchises are successful, however, they have significant barriers to entry in their multi-gigabyte game clients. Sure, an installation won’t deter a hardcore gamer, but for the many casual players out there, the extra step is a non-starter.
For this reason, web games have enormous potential when it comes to massively multiplayer experiences. While downloading and installing a client might be too much for some, playing a game by simply visiting a web page is low-friction and conducive to virality. I’m currently building such a game, and in this blog post, I’d like to share my experiences in establishing a raw connection between a browser and the game server.
tl;dr: If you’re already familiar with the concepts, you can check out the full example code to get started.
TCP vs. UDP
One of the first steps in developing any multiplayer game is to decide on a transport layer protocol, the two most popular by far being TCP and UDP. Numerous resources have covered the differences extensively2,3, so I’ll only give this topic a brief treatment. In short, UDP is a simple connectionless protocol that allows a source to send individual packets to a destination. Because of the unreliable nature of the network, some packets might get dropped or arrive at the destination at different times, for which UDP does not offer any safeguards. TCP, on the other hand, is connection-based and guarantees that packets are delivered and received in the order sent by the source. This, of course, comes at the expense of speed because the source will need acknowledgement that a packet was actually received before sending the next one.
While TCP has been used in many successful games (most notably World of Warcraft), most modern online games favor UDP because packet retransmission in the event of dropped packets and its associated latency is not only unnecessary but also unacceptable during fast-paced gameplay. UDP is definitely a bit more complicated to work with, but with some effort4, you can leverage its flexibility to your advantage and avoid bloating your ping.
UDP on the browser
“That sounds great,” you say, “but what’s the catch?” Normally, there is no catch as long as you take care in guarding against transmission failures and network congestion. Unfortunately for us, there is one really big catch when it comes to web games– for security reasons, there is no cross-platform way of sending or receiving packets via UDP in the browser5. Most online web games like agar.io instead rely on WebSockets for networking which exposes a clean interface for TCP connections with a server. However, as I mentioned earlier, TCP breaks down where sub-second reactions are necessary, so does this mean we’re stuck distributing our shooters and MOBAs as native clients?
Saved by WebRTC
Of course not! No matter how convoluted the solution, the web will always find a way. Enter WebRTC, a browser API that enables real-time communication for peer-to-peer connections6. While the bulk of WebRTC is tailored for media transfer (e.g. voice chat in Discord’s web app or video calling in web Messenger), it contains a small, often overlooked specification called Data Channels which allows for sending arbitrary messages between two peer browsers.
I mentioned earlier that TCP and UDP are the most popular transport layer protocols, but they are far from the only ones. WebRTC data channels use the Stream Control Transmission Protocol (SCTP) which is connection oriented like TCP but allows for configurability when it comes to reliability and delivery of packets. In other words, SCTP can be configured to behave like TCP with guaranteed delivery and ordering of packets, or we can turn those features off to end up with something analogous to UDP.
So this is great; with WebRTC data channels, we can send messages over SCTP configured to behave like UDP, solving our problem perfectly. As it turns out, however, WebRTC is a roaring beast that shakes the Earth with the force of a thousand monsoons when you attempt to set it up. In fact, the last few times WebRTC was mentioned on Hacker News in a gaming context, many commenters noted how they were either unable to get it working or deterred by its complexity from even trying7,8. In addition, WebRTC is meant for peer-to-peer connections, whereas most competitive networked games today require a client-server model to prevent cheating9. Of course, we have no other option but to treat the server as just another neighborhood “peer” which presents extra hoops to jump through to get a connection going.
Challenges in peer-to-peer networking
Continuing with the theme of inconveniences, peer-to-peer communication over modern networks presents yet another challenge in itself. In an ideal world, every client would have its own fixed IP address that other clients can use to establish direct connections. However, the IPv4 address space is limited in practice to around three billion unique addresses, barely sufficient for every other person in the world to have a single internet-connected computer, let alone additional tablets, laptops, and IoT immersion cookers. As a temporary fix in the lull before IPv6, most home and corporate networks employ a process known as Network Address Translation (NAT).
Without going into too much detail, a NAT device such as a home router manages the connections of all computers within its network. For example, all of the internet-connected devices in your apartment most likely sit behind a single router which has a public facing IP such as 50.50.50.50. To conserve the IPv4 address space, your consumer devices all share the NAT device’s public IP while each is assigned its own local IP that is unique only within the local network (such as 192.168.0.10). Of course, computers on the wider internet cannot contact or uniquely identify your home computer using its local address; thousands, if not millions of devices across the world all have the same local IP.
This is where Network Address Translation comes into play. While foreign devices can’t contact your computer directly, they can get pretty close by contacting the distinct public IP of the NAT device your computer is behind. The router can then translate the incoming request into a local address using a lookup table and subsequently forward the request on to your home computer.
More concretely, your computer will contact a server by first sending its request to the router which in turn associates that computer’s local IP with a free port on the NAT device. It then sends the request out to the intended destination by replacing the sender address with the NAT device’s IP combined with the port it just assigned to your home computer. For example, the NAT device might forward a request to the destination server that appears to originate from 50.50.50.50:20000.
The server, however, doesn’t care if the requesting address results from NAT; when it’s ready, the server will simply send its response back to whatever address was supplied in the sender field. This results in the server sending a response back to the NAT device along the port uniquely associated with your home computer. The NAT device will then receive the server’s response and route it to the correct computer using a lookup table. Thus, the IPv4 address space is conserved with all of the indirection required to do so abstracted away from both the client and server. With NAT, everyone’s happy!
Well, except us. In the previous example, we assumed the home computer already knew the public IP of a server that is not behind NAT. WebRTC, on the other hand, is designed for peer-to-peer connections where both parties are likely to be behind a NAT device and neither address is already known. WebRTC thus mandates an intermediate discovery step called NAT traversal that we must implement even though in our client-server use case, the address of the server is actually known beforehand.
The most lightweight protocol for this step is known as STUN in which peers ping a dedicated server called a STUN server to discover their public IP address and port combinations (such as 50.50.50.50:20000). Both peers request their addresses from the STUN server, and the STUN server sends back the public IP and port it received the request on. Both peers now effectively know their own “public” IPs from the STUN server’s response which they can use to begin establishing a WebRTC connection.
Unfortunately, as a final complication, corporate networks often employ special types of NAT such as symmetric NAT for which STUN is ineffective for reasons we’ll get into at the end of this blog post. In these rare cases, we are forced to use other protocols such as TURN to establish a connection. To manage the alphabet soup of possible NAT traversal protocols, WebRTC uses yet another protocol called ICE to rule them all. ICE performs checks on the network and uses STUN if it’s available, and if not, falls back to a more complex protocol like TURN. We will continue under the assumption that we are on a traditional home network that supports STUN.
WebRTC Peer Connection and Data Channels
With all of the background information out of the way, I’ll now present a high level overview of the WebRTC data channel creation process and then jump into the actual code necessary for setting up your own client and server.
WebRTC provides an interface called RTCPeerConnection that serves as the starting point to create any type of connection, data channel or otherwise. The client can initialize an RTCPeerConnection object and begin to look for other peer clients to connect to and begin exchanging data. Of course, at this point the client has no way of directly knowing what other clients are out there. In WebRTC terms, we solve this through an application-specific process known as signaling where two peers exchange a handshake through a known server and learn of each other’s “public” IP using ICE and STUN. As a real world example, two friends on Messenger can only initiate a peer-to-peer call after they both exchange their publicly accessible addresses through Facebook’s central servers.
After the signaling process, both clients know how to directly contact the other and have all the information that should be needed to send arbitrary packets. As we mentioned earlier, however, WebRTC is geared towards media transfer and also requires clients to exchange data about their media capabilities before any type of connection is finalized. Even though we’re not using any part of the media APIs, we are still mandated by WebRTC to make the full media handshake before a data channel is opened. This handshake, known as the Session Description Protocol (SDP) is as follows:
- Client 1 and Client 2 both connect to some pre-defined server known as the signaling server.
- They learn of each other’s existence through the signaling server, and they decide to initiate a connection.
- Client 1 creates an “offer” using
RTCPeerConnection.createOfferwhich subsequently contains information about Client 1’s media capabilities (for example, if it has a webcam or can play audio). - Client 1 sends the offer to Client 2 by proxying through the signaling server.
- Client 2 receives the offer from the signaling server and passes it to
RTCPeerConnection.createAnswerto create an “answer” with Client 2’s own media capabilities. - Client 2 sends the answer back to Client 1 through the signaling server.
- Client 1 receives and verifies the answer. It then starts the ICE protocol which in our example, contacts the STUN server to discover its public IP. When the STUN server responds, it sends this information (known as an “ICE candidate”) to Client 2 through the signaling server.
- Client 2 receives Client 1’s ICE candidates, finds its own ICE candidates via the same mechanism, and sends them to Client 1 via the signaling server.
- Each client now knows the other one’s media capabilities and publicly accessible IPs. They exchange direct pings without the aid of the signaling server, and the connection is established. The two clients can now happily send each other messages through the
RTCDataChannelAPI.
WebRTC in a client-server model
At the end of the day, we can just treat the game client as “Client 1” and the game server as “Client 2” and follow the complicated, but well-defined WebRTC protocol to establish a client-server connection. Implementing the WebRTC connection on the client is straightforward; WebRTC is first and foremost a browser API, so we can just call the correct functions that most modern browsers provide.
While WebRTC has fairly decent browser support, using the WebRTC API on the server is a completely different story. For some personal flavor, I was originally writing my game server in JavaScript with Node.js. I started out using node-webrtc which is a JavaScript wrapper around the Chromium WebRTC library. However, I soon found that node-webrtc depends on extremely old WebRTC binaries that use an outdated SDP handshake incompatible with modern Chrome10. I then pivoted to electron-webrtc which simply runs a headless electron client in the background that offers its WebRTC capabilities through interprocess communication. I was able to get a basic connection going with electron-webrtc without much difficulty, but I had concerns about its scalability resulting from the extra overhead in shuffling data between the main process and a full-fledged electron application.
At the end of the day, I realized that I’m just not that comfortable reasoning about performance in JavaScript and that my game server requires a platform with strong multithreading support. I decided to cut all the excess and take the traditional route of building my game server in C++. For WebRTC functionality, I can then link Chromium’s WebRTC library which is also written in native code.
So now we have our client running in the browser with JavaScript, our server running in C++, but we still have the one more piece of the puzzle– the signaling server that connects the two peers. Fortunately, we can cut corners here for once because the game server is a special peer that we actually know the direct address of beforehand. We can simply run a lightweight WebSockets library in the background of our game server and easily connect to it via TCP from the client. The client can then send WebRTC offers via the WebSocket, and the server can process the data locally without having to forward it like in a traditional signaling server.
Implementation
We’ve covered a lot of information, and now let’s finally put it all together in a minimal example of a client-server WebRTC connection. For the sake of consistency, my client is running on OS X and Chrome 56, and my server is running on Ubuntu 16.04 on a c4.xlarge EC2 instance (overkill for a development server, but hey I have credits that expire soon). I’m compiling my server with gcc 5.4. The full source code of both the client and the server are available on my GitHub which should help you follow along.
The first thing we need to do is set up the server dependencies. If you’re not very comfortable wrangling C++ build tools, you can clone the fully functional repo I linked above and use that as a starting point. We will be using WebSocket++, a header-only C++ WebSockets implementation for our pseudo-signaling server. WebSocket++ itself depends on Boost.Asio for asynchronous programming which we can easily install with apt-get install libboost-all-dev. Since WebSocket++ is a header-only library, we can simply clone the repo and copy the websocketpp subdirectory into our include path.
We also need a format for sending structured messages between the client and the server. In production, I would use a compact and performant serialization solution such as Protocol Buffers, but for the purposes of this demo, we’ll just use JSON because of its first class support in JavaScript. On the server side, I’ll use rapidjson to parse and serialize data. Like WebSocket++, this is a header-only library, so you can just clone the repo and copy the include/rapidjson subdirectory into the include path.
Next we have to build and install Chromium’s WebRTC library. This is the library used in Chrome for its WebRTC functionality, so it’s guaranteed to be correct and efficient. I originally built it from scratch, but this is a pain because you need to clone the repo, build with the Chromium-specific build tools, and place the output into the shared libraries folder. I recently found a nice collection of scripts that do the heavy lifting for you which I highly recommend using for your own sanity.
Even with this convenient utility, I still ran into issues when the most recent commit on Chromium master failed to build on my machine. I had to go a few commits back before finding a green build. I settled on commit 3dda246b69, so if you have trouble building WebRTC, I recommend starting with the same commit hash. If you’re using aisouard’s libwebrtc scripts linked above, the way to specify a commit of WebRTC to build unfortunately has changed since I first started using it. As such, I’ve locked my server setup process to use commit 83814ef6f3 of the libwebrtc scripts, so checkout that revision if you want to follow along. All said and done, you can install WebRTC in just a few commands:
apt-get install build-essential libglib2.0-dev libgtk2.0-dev libxtst-dev \
  libxss-dev libpci-dev libdbus-1-dev libgconf2-dev \
  libgnome-keyring-dev libnss3-dev libasound2-dev libpulse-dev \
  libudev-dev cmake
git clone https://github.com/aisouard/libwebrtc.git
cd libwebrtc
<OPTIONAL> git checkout 83814ef6f3
<OPTIONAL> vim CMakeModules/Version.cmake
<OPTIONAL> change the LIBWEBRTC_WEBRTC_REVISION hash to 3dda246b69df7ff489660e0aee0378210104240b
git submodule init
git submodule update
mkdir out
cd out
cmake ..
make
make install
We now have all of our server dependencies, so let’s get a basic WebSockets connection going. This is the full code for getting it off the ground:
[main.cpp]
#include <websocketpp/config/asio_no_tls.hpp>
#include <websocketpp/server.hpp>

#include <iostream>

using websocketpp::lib::placeholders::_1;
using websocketpp::lib::placeholders::_2;
using websocketpp::lib::bind;

typedef websocketpp::server<websocketpp::config::asio> WebSocketServer;
typedef WebSocketServer::message_ptr message_ptr;

// The WebSocket server being used to handshake with the clients.
WebSocketServer server;

// Callback for when the WebSocket server receives a message from the client.
void OnWebSocketMessage(WebSocketServer* s, websocketpp::connection_hdl hdl, message_ptr msg) {
  std::cout << msg->get_payload() << std::endl;
}

int main() {
  // In a real game server, you would run the WebSocket server as a separate thread so your main process can handle the game loop.
  server.set_message_handler(bind(OnWebSocketMessage, &server, ::_1, ::_2));
  server.init_asio();
  server.set_reuse_addr(true);
  server.listen(8080);
  server.start_accept();
  // I don't do it here, but you should gracefully handle closing the connection.
  server.run();
}
This code shouldn’t look too complicated; we’re just creating a WebSocketServer object backed by asio, setting a message handler, and calling some configuration methods. As noted in the comments, this will cause your main server to run the WebSocket listening loop preventing it from doing anything else. In a real project, you should run the WebSocket server as a separate thread. You can verify that your WebSocket server is actually running by invoking telnet <server IP> 8080 from your personal machine.
The corresponding client code to communicate with the WebSocket on the server is similarly straightforward.
[example-client.js]
// URL to the server with the port we are using for WebSockets.
const webSocketUrl = 'ws://<replace with server address>:8080';
// The WebSocket object used to manage a connection.
let webSocketConnection = null;

// Callback for when the WebSocket is successfully opened.
function onWebSocketOpen() {
  console.log('Opened!');
  webSocketConnection.send('Hello, world!');
}

// Callback for when we receive a message from the server via the WebSocket.
function onWebSocketMessage(event) {
  console.log(event.data);
}

// Connects by creating a new WebSocket connection and associating some callbacks.
function connect() {
  webSocketConnection = new WebSocket(webSocketUrl);
  webSocketConnection.onopen = onWebSocketOpen;
  webSocketConnection.onmessage = onWebSocketMessage;
}
While simple, this demonstrates all of the functionality we need: creating a new WebSocket on the client, assigning some callbacks, and sending a message. If you call connect, you should see “Opened!” print on the browser console and “Hello, world!” print on the server’s standard output.
We can now instantiate an RTCPeerConnection and an RTCDataChannel which are part of the browser API. RTCPeerConnection is then used to create an offer for SDP which is sent to the server via our WebSockets connection.
[example-client.js]
function onWebSocketOpen() {
  const config = { iceServers: [{ url: 'stun:stun.l.google.com:19302' }] };
  rtcPeerConnection = new RTCPeerConnection(config);
  const dataChannelConfig = { ordered: false, maxRetransmits: 0 };
  dataChannel = rtcPeerConnection.createDataChannel('dc', dataChannelConfig);
  dataChannel.onmessage = onDataChannelMessage;
  dataChannel.onopen = onDataChannelOpen;
  const sdpConstraints = {
    mandatory: {
      OfferToReceiveAudio: false,
      OfferToReceiveVideo: false,
    },
  };
  rtcPeerConnection.onicecandidate = onIceCandidate;
  rtcPeerConnection.createOffer(onOfferCreated, () => {}, sdpConstraints);
}
We create the RTCPeerConnection with a URL to a STUN server. stun:stun.l.google.com:19302 is a public STUN server kindly maintained by Google for development use, so it is recommended to set up your own STUN server for use in production. Next, we create a data channel associated with the RTCPeerConnection and specify to use unordered, unreliable SCTP in the configuration object. We bind some callbacks which we’ll come back to later, and we attempt to create an SDP offer. The first argument of createOffer is a callback for creation success, the second argument is a callback for creation failure, and the final argument is a self-explanatory configuration object. The actual offer is passed to the success callback.
[example-client.js]
function onOfferCreated(description) {
  rtcPeerConnection.setLocalDescription(description);
  webSocketConnection.send(JSON.stringify({type: 'offer', payload: description}));
}
In the offer callback, we store the client’s own media capabilities by calling setLocalDescription and then send our offer over the WebSocket as stringified JSON. On the server side, we can handle this request by parsing the JSON.
[main.cpp]
#include <rapidjson/document.h>

OnWebSocketMessage(WebSocketServer* s, websocketpp::connection_hdl hdl, message_ptr msg) {
  rapidjson::Document message_object;
  message_object.Parse(msg->get_payload().c_str());
  // Probably should do some error checking on the JSON object.
  std::string type = message_object["type"].GetString();
  if (type == "offer") {
    std::string sdp = message_object["payload"]["sdp"].GetString();
    // Do some some stuff with the offer.
  } else {
    std::cout << "Unrecognized WebSocket message type." << std::endl;
  }
}
At this point, we want to create an RTCPeerConnection and an RTCDataChannel on the server so we can process the client’s offer and generate an answer. Unfortunately as it goes with C++, there’s a fair amount of boilerplate code required to accomplish the same task that takes 15 lines of JavaScript. The main difference is that the WebRTC library uses the observer pattern to handle WebRTC events like onmessage and onOfferCreated instead of convenient JS callbacks. To even get a peer connection running, we have to implement all 19 possible events by overriding the webrtc::*Observer family of abstract classes.
webrtc::PeerConnectionObserverfor peer connection events such as receiving ICE candidates.webrtc::CreateSessionDescriptionObserverfor creating an offer or answer.webrtc::SetSessionDescriptionObserverfor acknowledging and storing an offer or answer.webrtc::DataChannelObserverfor data channel events like receiving SCTP messages.
I provide observers.h which implements no-ops for most of these event methods to ease your development. In practice, we only care about a few of these events anyways. For the events we do need to act on, we provide callback functions that we will later define in main.cpp.
[main.cpp]
#include "observers.h"

void OnDataChannelCreated(webrtc::DataChannelInterface* channel);
void OnIceCandidate(const webrtc::IceCandidateInterface* candidate);
void OnDataChannelMessage(const webrtc::DataBuffer& buffer);
void OnAnswerCreated(webrtc::SessionDescriptionInterface* desc);

PeerConnectionObserver peer_connection_observer(OnDataChannelCreated, OnIceCandidate);
DataChannelObserver data_channel_observer(OnDataChannelMessage);
CreateSessionDescriptionObserver create_session_description_observer(OnAnswerCreated);
SetSessionDescriptionObserver set_session_description_observer;
We now need to understand a little about WebRTC’s threading model. In short, WebRTC requires two threads for its operation– the signaling thread and the worker thread. The signaling thread handles the bulk of WebRTC computation; it creates all of the basic components and fires events we can consume by calling the observer methods defined in observers.h. The worker thread, on the other hand, is delegated resource-intensive tasks such as media streaming to ensure that the signaling thread doesn’t get blocked. WebRTC will automatically create both threads for us if we use a PeerConnectionFactory.
[main.cpp]
#include <webrtc/api/peerconnectioninterface.h>
#include <webrtc/base/physicalsocketserver.h>
#include <webrtc/base/ssladapter.h>
#include <webrtc/base/thread.h>

#include <thread>

rtc::scoped_refptr<webrtc::PeerConnectionFactoryInterface> peer_connection_factory;
rtc::PhysicalSocketServer socket_server;
std::thread webrtc_thread;

void SignalThreadEntry() {
  // Create the PeerConnectionFactory.
  rtc::InitializeSSL();
  peer_connection_factory = webrtc::CreatePeerConnectionFactory();
  rtc::Thread* signaling_thread = rtc::Thread::Current();
  signaling_thread->set_socketserver(&socket_server);
  signaling_thread->Run();
  signaling_thread->set_socketserver(nullptr);
}

int main() {
  webrtc_thread = std::thread(SignalThreadEntry);
  // ... set up the WebSocket server.
}
CreatePeerConnectionFactory will set the current thread to the signaling thread and create some worker thread in the background. Since we’re using the main thread for the WebSocket listening loop, we need to create a new webrtc_thread so both WebRTC and WebSockets can coexist.
In the WebRTC thread entry function, we instantiate a PeerConnectionFactory which will designate that thread as the signaling thread. After performing some setup such as providing a socket to communicate with the worker thread, we can finally use the factory to spawn an RTCPeerConnection and respond to the SDP.
[main.cpp]
rtc::scoped_refptr<webrtc::PeerConnectionInterface> peer_connection;
rtc::scoped_refptr<webrtc::DataChannelInterface> data_channel;

void OnWebSocketMessage(...) {
  // ... parse the JSON.
  if (type == "offer") {
    std::string sdp = message_object["payload"]["sdp"].GetString();
    webrtc::PeerConnectionInterface::RTCConfiguration configuration;
    webrtc::PeerConnectionInterface::IceServer ice_server;
    ice_server.uri = "stun:stun.l.google.com:19302";
    configuration.servers.push_back(ice_server);

    // Create the RTCPeerConnection with an observer.
    peer_connection = peer_connection_factory->CreatePeerConnection(configuration, nullptr, nullptr, &peer_connection_observer);
    webrtc::DataChannelInit data_channel_config;
    data_channel_config.ordered = false;
    data_channel_config.maxRetransmits = 0;
    // Create the RTCDataChannel with an observer.
    data_channel = peer_connection->CreateDataChannel("dc", &data_channel_config);
    data_channel->RegisterObserver(&data_channel_observer);

    webrtc::SdpParseError error;
    webrtc::SessionDescriptionInterface* session_description(webrtc::CreateSessionDescription("offer", sdp, &error));
    // Store the client's SDP offer.
    peer_connection->SetRemoteDescription(&set_session_description_observer, session_description);
    // Creates an answer to send back.
    peer_connection->CreateAnswer(&create_session_description_observer, nullptr);
  }
  // ... handle other cases.
}
While this looks complicated, it is essentially doing the same thing as the JavaScript code we wrote for the client. First we create an RTCPeerConnection with Google’s development STUN server and use it to create a data channel that transmits via unordered, unreliable SCTP. Finally, we store the client’s offer using SetRemoteDescription and create an answer to send back to the client. CreateAnswer will trigger the OnSuccess event of CreateSessionDescriptionObserver. This will in turn invoke our OnAnswerCreated callback to which we can add code for sending the answer to the client.
[main.cpp]
#include <rapidjson/stringbuffer.h>
#include <rapidjson/writer.h>

void OnAnswerCreated(webrtc::SessionDescriptionInterface* desc) {
  peer_connection->SetLocalDescription(&set_session_description_observer, desc);
  std::string offer_string;
  desc->ToString(&offer_string);
  rapidjson::Document message_object;
  message_object.SetObject();
  message_object.AddMember("type", "answer", message_object.GetAllocator());
  rapidjson::Value sdp_value;
  sdp_value.SetString(rapidjson::StringRef(offer_string.c_str()));
  rapidjson::Value message_payload;
  message_payload.SetObject();
  message_payload.AddMember("type", "answer", message_object.GetAllocator());
  message_payload.AddMember("sdp", sdp_value, message_object.GetAllocator());
  message_object.AddMember("payload", message_payload, message_object.GetAllocator());
  rapidjson::StringBuffer strbuf;
  rapidjson::Writer<rapidjson::StringBuffer> writer(strbuf);
  message_object.Accept(writer);
  std::string payload = strbuf.GetString();
  ws_server.send(websocket_connection_handler, payload, websocketpp::frame::opcode::value::text);
}
We store the server’s own answer (passed in as the argument) using SetLocalDescription. Here, we encounter rapidjson's extremely poor code ergonomics, but hopefully it’s clear that all we’re doing is building a simple JSON blob field by field. Once we build the message, we stringify it and send the answer back to the client.
[example-client.js]
function onWebSocketMessage(event) {
  const messageObject = JSON.parse(event.data);
  if (messageObject.type === 'answer') {
    rtcPeerConnection.setRemoteDescription(new RTCSessionDescription(messageObject.payload));
  } else {
    console.log('Unrecognized WebSocket message type.');
  }
}
We handle the message by parsing it to get its type and payload. The client proceeds to stores the server’s SDP answer by calling setRemoteDescription with the message payload.
Now that the client and server have exchanged their media capabilities as mandated by WebRTC, all that’s left is to exchange their publicly accessible addresses in the form of ICE candidates. On the client’s side, RTCPeerConnection manages most of this for us; it performs the ICE protocol using the provided STUN server and passes all found ICE candidates to the rtcPeerConnection.onicecandidate callback. All we have to do then is send the ICE candidates to the server in the function we earlier assigned to onicecandidate.
[example-client.js]
function onIceCandidate(event) {
  if (event && event.candidate) {
    webSocketConnection.send(JSON.stringify({type: 'candidate', payload: event.candidate}));
  }
}
We can handle this message on the server in OnWebSocketMessage.
[main.cpp]
void OnWebSocketMessage(...) {
  // ... Parse JSON and handle an offer message.
  } else if (type == "candidate") {
    std::string candidate = message_object["payload"]["candidate"].GetString();
    int sdp_mline_index = message_object["payload"]["sdpMLineIndex"].GetInt();
    std::string sdp_mid = message_object["payload"]["sdpMid"].GetString();
    webrtc::SdpParseError error;
    auto candidate_object = webrtc::CreateIceCandidate(sdp_mid, sdp_mline_index, candidate, &error);
    peer_connection->AddIceCandidate(candidate_object);
  } else {
  // ... Handle unrecognized type.
}
The server parses the fields of the JSON blob into a proper WebRTC ICE candidate object which is then saved via AddIceCandidate.
The server’s own ICE candidates are similarly generated by the peer connection, but this time they are passed to OnIceCandidate through the PeerConnectionObserver. We provided our own callback for this function where we can forward the candidates to the client.
[main.cpp]
void OnIceCandidate(const webrtc::IceCandidateInterface* candidate) {
  std::string candidate_str;
  candidate->ToString(&candidate_str);
  rapidjson::Document message_object;
  message_object.SetObject();
  message_object.AddMember("type", "candidate", message_object.GetAllocator());
  rapidjson::Value candidate_value;
  candidate_value.SetString(rapidjson::StringRef(candidate_str.c_str()));
  rapidjson::Value sdp_mid_value;
  sdp_mid_value.SetString(rapidjson::StringRef(candidate->sdp_mid().c_str()));
  rapidjson::Value message_payload;
  message_payload.SetObject();
  message_payload.AddMember("candidate", candidate_value, message_object.GetAllocator());
  message_payload.AddMember("sdpMid", sdp_mid_value, message_object.GetAllocator());
  message_payload.AddMember("sdpMLineIndex", candidate->sdp_mline_index(),
      message_object.GetAllocator());
  message_object.AddMember("payload", message_payload, message_object.GetAllocator());
  rapidjson::StringBuffer strbuf;
  rapidjson::Writer<rapidjson::StringBuffer> writer(strbuf);
  message_object.Accept(writer);
  std::string payload = strbuf.GetString();
  ws_server.send(websocket_connection_handler, payload, websocketpp::frame::opcode::value::text);
}
Again, the code is overly verbose because of rapidjson, but it’s straightforward and analagous to the client’s own onIceCandidate callback. The server takes the provided ICE candidate, parses its fields into a JSON object, and sends it via the WebSocket.
The client receives the ICE candidate from the server in onWebSocketMessage where it also makes a call to addIceCandidate.
[example-client.js]
function onWebSocketMessage(event) {
  // ... Parse string and handle answer.
  } else if (messageObject.type === 'candidate') {
    rtcPeerConnection.addIceCandidate(new RTCIceCandidate(messageObject.payload));
  } else {
  // ... Handle unrecognized type.
}
If you did everything correctly, calling connect on the client should now initiate and (hopefully) complete the handshake with the server. We can verify by using the onDataChannelOpen callback we assigned earlier to dataChannel.onopen.
[example-client.js]
function onDataChannelOpen() {
  console.log('Data channel opened!');
}
If the handshake was successful, onDataChennelOpen should get fired, and a congratulatory message will be output to the console! We can then use this newly opened data channel to ping the server.
[example-client.js]
function ping() {
  dataChannel.send('ping');
}
The server similarly receives an event when the data channel was successfully opened. This is triggered through the OnDataChannelCreated callback via the PeerConnectionObserver. Unlike the client, however, the server has one extra step to do. On opening the original data channel, the WebRTC library creates a new data channel with updated fields which is passed as an argument to the OnDataChannelCreated callback. This step is abstracted away in the client code, but it’s not terribly difficult to reassign the new data channel and rebind the DataChannelObserver on the server.
[main.cpp]
void OnDataChannelCreated(webrtc::DataChannelInterface* channel) {
  data_channel = channel;
  data_channel->RegisterObserver(&data_channel_observer);
}
Since the DataChannelObserver is now rebound to the correct data channel, the server can now begin receiving messages via its OnDataChannelMessage callback.
[main.cpp]
void OnDataChannelMessage(const webrtc::DataBuffer& buffer) {
  std::string data(buffer.data.data<char>(), buffer.data.size());
  std::cout << data << std::endl;
  std::string str = "pong";
  webrtc::DataBuffer resp(rtc::CopyOnWriteBuffer(str.c_str(), str.length()), false /* binary array */);
  data_channel->Send(resp);
}
This prints the received ping (managed by a WebRTC DataBuffer) to standard output and responds with a pong. The client can handle the pong via the onDataChannelMessage which we assigned to dataChannel.onmessage.
[example-client.js]
function onDataChannelMessage(event) {
  console.log(event.data);
}
And finally, we’re done! If implemented correctly, we reap the fruits of our labor by calling ping which will send a “ping” message to the server. The server handles the client’s message, printing “ping” to standard output and sends back a “pong” message. Upon reception of the server’s message, the client outputs “pong” to the browser console.
Benchmarks
Whew, that was a lot of concepts and code just to establish a simple connection. Initializing a similar connection with WebSockets only takes around 10 lines of client code and 20 lines of server code. Given this disparity in upfront costs, is WebRTC with its associated boilerplate even worth it? I ran some benchmarks to find out.
In the first test, I sent 20 pings a second from the client to the server for 20 seconds and measured the round trip time. I did this on a “perfect connection” with no packet loss for both WebRTC data channels (SCTP) and a simple WebSockets connection (TCP).

As expected, in the absence of packet loss, both WebRTC and WebSockets perform acceptably with WebRTC RTT clustered around 40-50ms and WebSockets averaging around 80-90ms. There is definitely some amount of overhead in the TCP protocol, but for most games, an extra 50ms or so won’t make or break the player experience.
In the second test, I sent pings at the same rate for the same duration, but I also used a traffic shaper to drop 5% of outgoing packets and 5% of incoming packets. Again, I tested on both WebRTC and WebSockets.
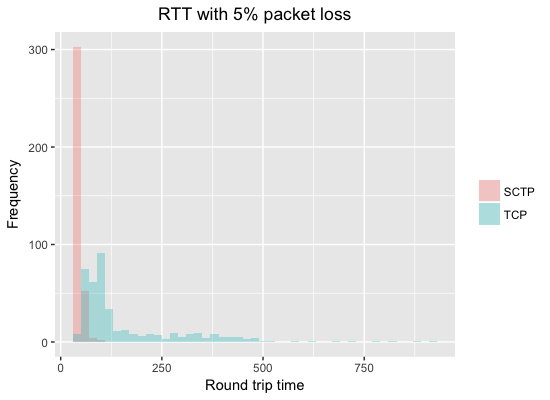
Admittedly, a 5% drop rate is a bit exaggerated, but the results are striking regardless. Since we are transmitting in unreliable SCTP for WebRTC, the distribution of RTT is completely unaffected. We dropped around 40 packets, but in the context of a game where the server sends state 20 times a second, this is a non-issue. The WebSocket implementation, on the other hand, has a long tail with some packets not arriving for over 900ms. Even worse, a very large percentage of packets had a RTT of over 250ms which would result in an extremely annoying experience that any gamer can attest to.
Conclusion
Though it took a lot of persistence, we were eventually able to shoehorn WebRTC into a client-server architecture. We implemented an example of a data channel connection that performs vastly better than WebSockets for both perfect connections and networks with packet loss. The example code, however, is largely illustrative and contains a whole host of suboptimal patterns. In addition to the global variables littered throughout the code, the server also contains a glaring inefficiency in its immediate handling of data channel messages in the OnDataChannelMessage callback. The cost of doing so in our example is negligible, but in an actual game server, the message handler will be a more costly function that must interact with state. The message handling function will then block the signaling thread from processing any other messages on the wire during its execution. To avoid this, I recommend pushing all messages onto a thread-safe message queue, and during the next game tick, the main game loop running in a different thread can process the network messages in batch. I use Facebook’s lock-free queue in my own game server for this. For ideas on how to better organize your game around WebRTC, feel free to take a look at my server code and client code.
There are also a couple caveats worth mentioning about WebRTC. First, WebRTC is not even supported yet in every major browser11. While both Firefox and Chrome have been on the list of supporting browsers for a long time, Safari and Edge are notably absent. I’m comfortable only supporting modern Firefox and Chrome in my own game, but depending your target audience, it might make more sense to just distribute a native client.
In addition, I mentioned earlier that corporate networks behind symmetric NAT devices cannot use STUN. This is because symmetric NAT offers additional security by not only associating a local IP with a port, but also with a destination. The NAT device will then only accept connections on the associated port from the original destination server. This means that while the STUN server can still discover the client’s NAT IP, that address is useless to other peers because only the STUN server can respond along it.
To solve this, we can use a different protocol called TURN which simply acts as a relay server that forwards packets in between the two peers. This approach, however, is suboptimal because it inflates round trip time between the peers as a result of the indirection. An interesting approach that I don’t think has been explored yet is to combine the TURN server with your game server, but run a custom TURN implementation that directly pushes the received packets to your game loop’s message queue. This solves the symmetric NAT problem and is even more efficient than the approach described in this blog post. I’m most likely going to experiment with this after I flesh out my game a bit more. Stay tuned!
Despite these setbacks, the WebRTC data channel is still a powerful tool which can be leveraged to improve the responsiveness of many web games. I’m excited about the future of WebRTC adoption and hopeful that it will usher in the next generation of massively multiplayer browser experiences.
Thanks for reading, and if you have any questions, please feel free to contact me or leave a comment below!
References
- https://www.superdataresearch.com/us-digital-games-market/
- http://gafferongames.com/networking-for-game-programmers/udp-vs-tcp/
- http://gamedev.stackexchange.com/questions/431/is-the-tcp-protocol-good-enough-for-real-time-multiplayer-games
- http://gafferongames.com/networking-for-game-programmers/
- http://new.gafferongames.com/post/why_cant_i_send_udp_packets_from_a_browser/
- https://www.html5rocks.com/en/tutorials/webrtc/basics/
- https://news.ycombinator.com/item?id=13741155
- https://news.ycombinator.com/item?id=13264952
- http://gamedev.stackexchange.com/questions/67738/limitations-of-p2p-multiplayer-games-vs-client-server
- https://github.com/js-platform/node-webrtc/issues/257
- http://caniuse.com/#feat=rtcpeerconnection